


Handling, transporting and temporary storage of birds before preparation
The following steps are very important to take to be successful at finishing our tasks. Neglecting them could result in damages beyond repair.
- After the game bird was shot we have to find the wounds by blowing on the feathers. The spilt blood must be absorbed, and then some hygroscopic material (such as wad or paper tissue) must be put on the wound to avoid getting dirty.
- The game must not be hanged by its neck because the neck feathers can be damaged that way.
- It's best to keep the bird hanging by its legs until it is cold.
- Do not put the animal into a plastic or a nylon bag.
- The feathers of the cold bird must be washed off of blood and mud with a wet sponge to avoid forming permanent stains.Then in a straight position (with its legs also straight) it must be wrapped in paper watching out carefully for the contour feathers and then it must be put in a plastic or nylon bag closed with a rubber ring. After that it can be put into a freezer just like any other type of food.
- A bird stored this way and kept on -20C is available for further processing for 1-2 years. Birds frozen without using a nylon bag can dry up to such an extent that it makes skinning very difficult later. The frozen bird can be transported any time and when wrapped in thick paper and using ice accumulators it can be kept for two days without any damage.
Handling, storing and transporting fur-bearing animals
- In case of small mammals the process is the same is with game birds.
- Cool the animal in hanged position. Body parts that are in connection with the ground or concrete surface (especially the belly) may become "green", the fur may come off and so the fur becomes unsuitable for preparation.
- In case of big games preparatory works start out on the hunting fields. First we have to decide what form we want to preserve the game in. Field-dressing is different whether we want to make a whole-body, a half-body taxidermy or a skin rug.
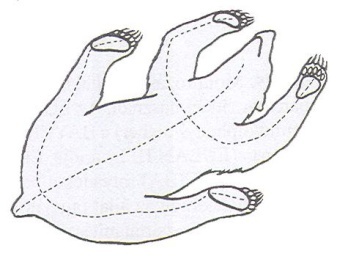
- When making a rug we have to lay the animal on its back and cut it from its jaws to the anal opening following the center line.
Sizing
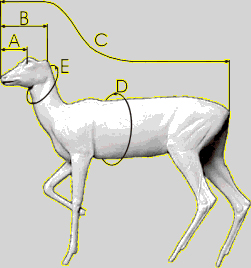
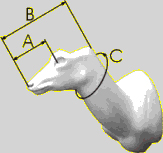
When making a head or a full body taxidermy we have to measure the whole body, since in most cases the body itself is not taken to the taxidermist.
The skin must be removed along the membrane using the palms or knife handle. When necessary we can make careful incisions as well. Take care not to cut through the skin and not to make unnecessary incisions.
When skinning the head the concha or ear-root must be cut right next to the skull and leave a big space around the lips, eyes and nose cartilage.
The cut on the belly side must be made to the anterior chest bone. Continue skinning the neck on the back from the shoulders to the nape.
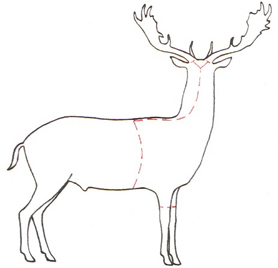
In case of antler species use a Y-shaped incision as show in the image. The antler roots must be opened using a very sharp knife and then the head must be skinned around.
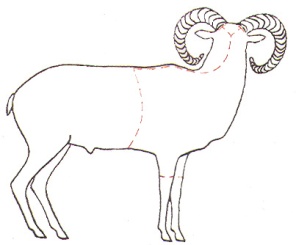
In case of a half taxidermy it is very important to leave enough skin! Cut the skin on the back at right angles to the line of the back as shown in the picture below.
Lay the nipped skin with its meat side up and level it. Rub the skin thoroughly with salt. Salt the head skin thoroughly next to the eyes, lips and ear roots. Leave the skin to rest for a day until the fluids dry out of it. The following day the skin of the belly part and the limbs should be folded in and then rolled from the head to the tail. The prepared skin should be put in a nylon bag and into a freezer. Use the skin for taxidermy as soon as possible.